Recently, I received a request from a client to demonstrate how to add Azure Cognitive Search functionality to a statically generated site built on Next.js.
Azure Cognitive Search is a search-as-a-service cloud solution that gives developers APIs and tools for adding a rich search experience over private, heterogeneous content in web, mobile, and enterprise applications.
Next.js is an open-source web development framework built on top of Node.js enabling React based web applications functionalities such as server-side rendering and generating static websites.
First I followed the Next.js Getting Started guide and created a new site:
1
2
3
| mkdir -p ./nextjs-search/src
cd ./nextjs-search/src
npx create-next-app@latest
|
Once the site was created, I ran the following command to launch the site:
Which produced the following output:
1
2
3
4
5
| yarn run v1.22.18
$ next dev
ready - started server on 0.0.0.0:3000, url: http://localhost:3000
wait - compiling...
event - compiled client and server successfully in 1058 ms (125 modules)
|
At this stage, I could launch the site and click around. Nothing much to see yet.
Next, I added the Ant Design React UI Library
Then, added a search page in the following path: src/pages/search.js:
 1
 2
 3
 4
 5
 6
 7
 8
 9
10
11
12
13
14
15
16
17
18
19
20
21
22
23
24
25
26
27
28
29
30
31
32
33
34
35
36
37
38
39
40
41
42
43
44
45
46
47
48
49
50
51
52
53
54
55
56
57
58
59
60
61
62
63
64
65
66
67
68
69
70
| import Head from 'next/head'
import Image from 'next/image'
import styles from '../styles/Search.module.css'
import 'antd/dist/antd.css'
import { Input, Space, List } from 'antd'
import React, { useState } from 'react';
const { Search } = Input;
export default function Find() {
const [ findings, setFindings ] = useState({ "count": 0, "results": [] })
const onSearch = async value => {
const res = await fetch(`/api/search?q=${value}`)
const json = await res.json();
setFindings({ "count": json.count || 0, "results": json.results });
}
return (
<div className={styles.container}>
<Head>
<title>Create Next App</title>
<meta name="description" content="Generated by create next app" />
<link rel="icon" href="/favicon.ico" />
</Head>
<main className={styles.content}>
<h1>Document Search</h1>
<Search
placeholder="input search text"
allowClear
enterButton="Search"
size="large"
onSearch={onSearch}
/>
<List
className="search-results"
itemLayout="horizontal"
dataSource={findings.results}
renderItem={item => (
<List.Item
actions={[<a key="list-loadmore-more">more</a>]}
>
<List.Item.Meta
avatar={<img src={item.picture} />}
title={<a href={"/api/document/"+item.name}>{item.name}</a>}
description={<><span><strong>Author:</strong> {item.author}</span> <span><strong>Created:</strong> {item.created}</span></>}
/>
<div>content</div>
</List.Item>
)}
/>
</main>
<footer className={styles.footer}>
<a
href="https://vercel.com?utm_source=create-next-app&utm_medium=default-template&utm_campaign=create-next-app"
target="_blank"
rel="noopener noreferrer"
>
Powered by{' '}
<span className={styles.logo}>
<Image src="/vercel.svg" alt="Vercel Logo" width={72} height={16} />
</span>
</a>
</footer>
</div>
)
}
|
The key players here are the Search and List components which, as the names suggest, enable the user to type in a search phrase and render the list of search results.
Next, I added the Azure Cognitive Search client library for JavaScript
1
| npm install @azure/search-documents
|
Next, I added a local environment variable file src/.env.local:
1
2
3
| SEARCH_ENDPOINT=https://<search-service-name>.search.windows.net
SEARCH_INDEX=<search-index-name>
SEARCH_KEY=<search-service-search-key>
|
Next.js comes with built-in support for environment variables, I am using to avoid accidentally leaking the search key and make it easier to deploy our application.
Then added a API page to act as a proxy for the Azure Cognitive Search service. src/pages/api/search.js:
 1
 2
 3
 4
 5
 6
 7
 8
 9
10
11
12
13
14
15
16
17
18
19
20
21
22
23
24
25
26
27
28
29
30
31
32
33
34
| const {
SearchClient,
AzureKeyCredential,
} = require("@azure/search-documents");
const client = new SearchClient(
process.env.SEARCH_ENDPOINT,
process.env.SEARCH_INDEX,
new AzureKeyCredential(process.env.SEARCH_KEY)
);
export default async function handler(request, response) {
var url = new URL(request.url, `http://${request.rawHeaders['Host']}`);
var query = url.searchParams.get('q');
const search = await client.search(query);
var results = new Array();
for await (const result of search.results) {
results.push({
"name": result.document.metadata_storage_name,
"author": result.document.metadata_author,
"contentType": result.document.metadata_storage_content_type,
"size": result.document.metadata_storage_size,
"created": result.document.metadata_creation_date,
"lastModified": result.document.metadata_storage_last_modified
});
};
response.status(200).json({
"count": search.count,
"results": results
})
}
|
NOTE:
I opted not to use the client library directly on the search page because, we do not want our search key exposed in the browser.
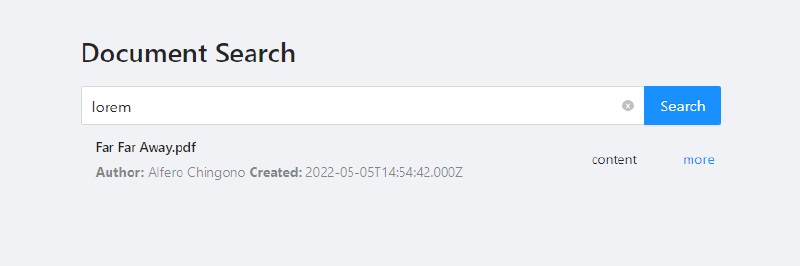
With that in place, our application is minimally functional. We can search documents and view the search results on the same page.
In a future post, I will show how I added features like Suggestions, AutoCompletion, and Facets to make the page more user friendly.
Hope you find this helpful, dear reader! The full source for this project can be found on my GitHub repo: https://github.com/achingono/nextjs-jam-search
References:
Next.js
Azure Cognitive Search
Azure Cognitive Search client library for JavaScript
Overview of adding search to a website
Create and load Search Index with JavaScript